When I started working as a storyboard artist some five years back, I was pretty happy to have found a way to get paid to draw. Though good with writing and languages and loved anything with storytelling, everywhere jobwise where there were technical words, I couldn’t keep my attention or interest for long.
Storyboarding felt like getting rid of technical stuff, strict technical lines, and boring paragraphs to explain simple things(more comfortable expressing with drawings). Just the blank paper and lovely cute borderless sketches.
My notebooks were filled with sketches starting from the back pages, so for some technical subjects like mathematics, my notebooks were filled more in the last pages with sketches than the actual subject matter in front. Storyboarding looked like the scribbling that I always had a habit of doing. But my eyes failed to notice the formatting or maybe just skipped it.
Through this blog, I will share with you my experience with storyboarding and show you how you can format storyboard panels for video animation effectively.
What is Storyboarding?
The movie or video that you watch first comes in the form of an idea that is depicted in graphic panels. Storyboarding is a collection of drawings in a certain order, complete with camera direction, dialogue, and other important features. It depicts the shot-by-shot progression of a video.


Storyboarding is Communicating Visually
While working on some assignments, I realized you can’t communicate everything with sketches. Words play an essential role and need to be involved in explaining the un-sketch-able things.
For example, using the word ‘postman’ instead of spending time finding references for costumes on the internet and recreating them accurately in sketches is a more imaginative solution.
As storyboards are not supposed to be a work of art but a communication tool, efficiency is the key factor. If you are an artist, you might fail to follow that even if you are aware of it, as artists have a habit of drawing trance to take them over.
But creating storyboards require a high quantity of work in less time, and you have to achieve that by making smart decisions in the drawings. Formatting also is a way to make things efficient by using it for planning and structuring your storytelling, by making it easy to understand by most people, especially those who are not into the artistic line.

As I got better with my skills, at some point, I started to make sketches as visually explaining as possible and minimize the words to explain them.
Also, at the same time, I started teaching this subject in film and media colleges, and while preparing the syllabus, I realized that’s the approach many great storyboard artists have, so while teaching it to students, it got ingrained in my practice too.
With more experience, words like ‘sequence no.’, ‘shot no.’, names of the projects made way in my sketches. This always reminded me that I am not supposed to make beautiful and perfect illustrations but a visual plot blueprint for the storytellers (directors). This was so because their scripts are to be communicated effectively to the animators, in their language, which is visuals, without losing any information from the video script.
Entry of the Border-Box
Then entered the boring border-box, which is actually very important for storyboarding. A border might seem to be limiting, but that’s what denotes the framing of the shots. Also, in storyboarding, you are allowed to draw outside borders, and in some cases, it’s necessary too.
Interesting right?
Let me explain with an example.
Imagine we are composing a shot of Iron man shooting a laser beam from his hand; it’s a close-up shot. Close up of iron man’s suit hand, drawn roughly, might not be super clear for everybody to understand. Some might not even realize what’s happening in the frame.
But if you use the space outside the border and draw the hand coming from a direction, it will give the sketch a context to understand what’s happening. And with a frame, you are not compromising with exact framing.
So basically, you can draw outside the border, frame, aspect ratio, whatever you call it, and use the full page to include more contact and clarity. Now, my storyboards are a technical presentation of artistic sketches or vector illustrations.

Formatting Storyboard Panels
Here at webdew, I make two types of storyboards, and for both, I use different panel formatting.
There is a standard format for vector storyboards that directly go to animators for animation. Vector illustrations like shot composition keep an overlapping removable strip of mismatching color where we add removable text of voiceover line for which the visual is designed.
I personally like to add a similar strip on top where I put the text if there are some additional instructions regarding movement or transitions etc., for the visual part, which might not have been possible to explain clearly in the illustration itself.

There are also rough concept sketches, which is a step added before preparing vector illustrations for high concept, complicated projects. These are usually made on a pen tablet, drawn with hands on a raster drawing software like Photoshop, Medibang, etc.
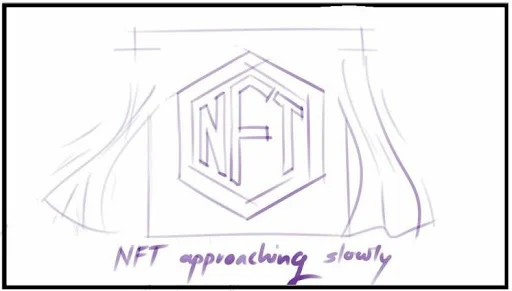
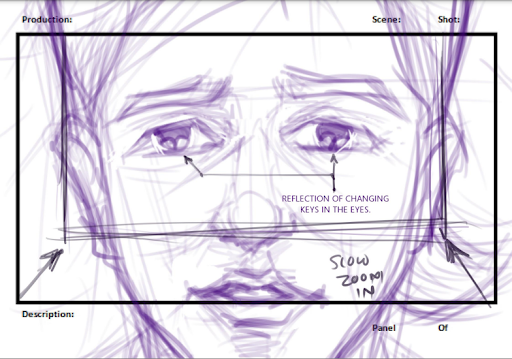
These can look very rough as the sketches are rough-looking. So having a good format helps in bringing some order visually and clarity in understanding. Along with voiceover text at the bottom and movement and visual instruction at the top with different colors, the format also includes the number of pages (for overall video) and the number of shots (for particular sequence).
We make explainer videos, and the ones I have worked on mostly span under 1 minute. But in some animation studios, the storyboard format can get very detailed.
Our storyboards are evolving to include the best tools of both worlds. Our concept storyboards look something like this:
In the current scenario, animators decide all the movements, and vector storyboard designers are supposed to adjust the script’s inaccurate visuals. But, I have realized I have some ideas about how even the movements can go (which is, in fact, expected from a live-action storyboard artist, in my experience). And I think including and improving the storyboard formats with small tweaks can significantly improve the quality of the animations.
Wrapping up
Finally, animation videos, storyboarding, and new combinations like ‘Tech-Ed’ (where creative and technical people learn to work together) are comparatively very new and in the process of early evolution. Things are changing pretty constantly.
There are many ways one can format storyboards. What matters is finding the most effective and efficient format for your team and your client to understand and use.
Are you thinking of making explainer videos, character animation, whiteboard animations, or 2D animation videos? Head over to www.webdew.com or, even better, contact us!
