Suppose you are using expressions in After Effects; it can automate repetitive tasks and allow you to construct flexible rigs for animators and do some amazing things that you could never do with keyframes. Moreover, they are not nearly as hard as you might think.
Through this blog, I will introduce you to 5 expression rigs in After Effects that are really handy if you are creating animation or motion graphics.
Let’s get straight into it…
Expression Rigs in After Effects
Here are the five expressions you can make use of while working on a project in After Effects:
Let us look at each of them in detail.
Expression Control
The advantages of using expression controls over traditional expression editors are that your expressions become more dynamic and easier to update. By linking the values to expression controls, rather than having to modify the values outside of the expression editor, you can update your expressions more easily.
When applying expression controls effects to a layer, you apply them the same way you apply other effects—such as dragging them onto the layer from the Effects & Presets panel.
You may use expression control effects on any layer, but it’s best to use them on a null layer that you can use as a controlling layer. You can then apply expressions to properties on other layers to get input from that layer. In this scenario, you’d apply the Slider Control effect to a null layer (Null 1), then use this expression to apply to the Position properties of several layers:

Using this example, as you drag the slider, all layers with this expression shift by 10 pixels, those layers with greater index numbers (layers at the bottom of the Timeline panel) shifted more than those with lower index numbers. On the null layer, you can set keyframes for the slider, so it animates accordingly on all the other layers.
To make it easier to understand what an Expression Control effect is controlling, it is often helpful to rename each instance of the effect to indicate its use.
For example, renaming the Color Control effect as sky color makes it obvious it is controlling the sky color. Just like a traditional effect, you may rename each instance of an expression control effect. Select it in the Timeline panel or Effect Controls panel and then press Enter on the main keyboard (Windows) or Return on the main keyboard (Mac OS).
Slider Control
After Effects Slider Controls are a great way to assign values to layers. Let us take an example to understand better- you can attach the opacity of layers to Slider Controls so users of your After Effects project can specify how opaque a specific layer should be. You can use sliders for adjusting much more than opacity: single value positions, transform properties, and effect intensities are also easily adjusted.
When you click the option+click button on the parameter that you want to use as a Slider Control, you will see an animated swirl logo. Simply drag the swirl logo to the Slider Control expression controller effect. You will now find your parameter value associated with the slider control.
You can easily set the minimum and maximum Slider Control values by right-clicking on the slider in the Effects panel and choosing ‘Set Value.’ From that point, you can easily adjust the minimum and maximum values.
If/else Expressions
After Effects’ If/Else statement is a set of codes that determines the output when an input value is changed.
In this example, the code indicates that if the white shape’s opacity is over 50%, the text will be 100% opaque, while if the white square’s opacity is under 50%, the text will be 50% opaque.

Using an If/Else statement is pretty straightforward. Open up your expression editor by holding the down option and clicking on the stopwatch next to the parameter that you wish to apply the If/Else statement.
The expression used in the example above is:
if(thisComp.layer(“WhiteShape”).transform.opacity>50) 100 else 50
< Less Than
> Greater Than
<= Less Than or Equal To
>= Greater Than or Equal To
== Equals To
Wiggle Expression
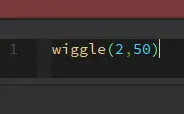
Wiggle is a popular After Effects expression because it is simple to apply and visually appealing. We can achieve this with a couple of integers instead of setting a bunch of keyframe animations to make a layer move randomly.

For example, using the Position Transform properties, I can wiggle the position of this text.
Expression Errors
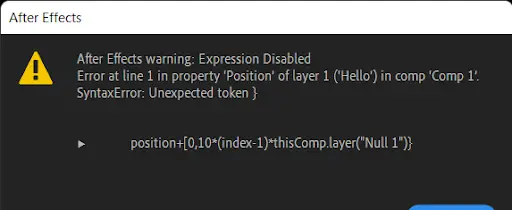
Whenever an expression fails to evaluate, it will appear in a warning banner at the bottom of the Composition panel and the Layer panel. The expression is not disabled, and it continues to evaluate until the validation is successful. Warning banners are displayed as long as the expression is unable to evaluate until the expression is fixed or manually disabled.

Wrapping Up
After Effects Expressions are snippets of code that instruct After Effects on how to handle your keyframed animation. Whatever you’re animating, there’s an Expression that may save you time and effort by removing the need to keyframe specific elements.
If you are looking to create any kind of animated video like 2D animation, character animation, whiteboard animation, or even motion graphics for your company, brand, or business, feel free to connect with us.
Editor: Amrutha