Adobe Illustrator is undoubtedly one of the most sought tools by graphic designers like me. Be it 2D animations, character animation, logo design, or 3D effects, Adobe offers a range of tools. Some tools may not be used frequently, yet they still add value to the software.
The Adobe Illustrator width tool is one such tool that is used for creating borders, horizontal breaks, and custom typography. Not only does it allow you to form and save custom stroke profiles, but it contributes to an efficient and time-effective workflow.
In this blog, I will share my knowledge of the width tool basics and some practical examples that put the tool to good use! If you are a character animation creator, this tool is a must know!
Basic Functions of the Width Tool
Let’s start with the basics. How can you start using it, and where can you find the tool?
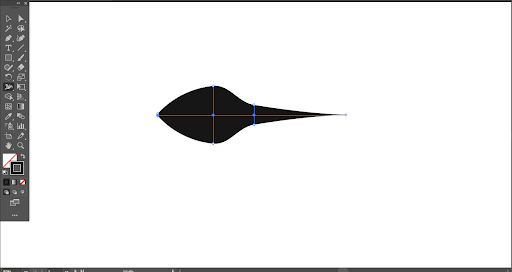
To use the Width Tool in Illustrator, select the Width Tool from the toolbar or use the shortcut Shift+ W.

To create anchor points for the design you wish to make, click, hold the mouse, and drag on the stroke. Pull up or down on these points to stretch or contract that segment of the stroke.
Asymmetrical Stroke Width

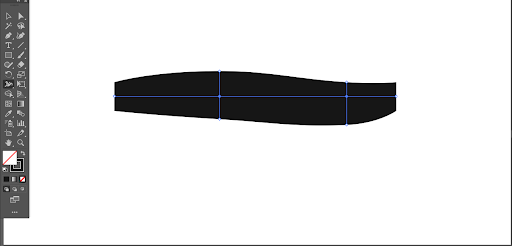
You can modify the stroke by holding Alt while dragging the width tool. Holding Alt will allow you to expand or contract just one side of a stroke rather than both directly.
Saving and Applying Width Profiles
The best thing about the width tool is that you can use it on any stroke regardless of the angle and length. It does not just make the stroke creative but also structured.

Another amazing thing about the width profile is that the arm can be applied to any stroke, regardless of angle and length. It not only makes the stroke profile efficient but also makes the stroke efficient.
I have shown you in the above image that stroke paths are often viewed by opening the Stroke window and clicking the Path dropdown. To feature a replacing path, select your modified stroke and choose the “Add to paths” option within the Profile dropdown of the Stroke window.

The image above shows us how to use a stroke path with only strokes.
Width Tool in Action
You are probably thinking of all the components and functions of the width tool. You can take a look at some real design examples where the width tool is used to help you understand better.

As shown in the image above, one stroke can be used to create “H.” Using the width tool, particular stroke segments can be thickened to create a calligraphic look. It works well for custom topography.

While creating a horizontal stroke, do not forget to make the number bulb and the shape of the demand. This stroke profile can be added to your profile library and applied to strokes on other assets in this project or similar ones.
It doesn’t get along with Brush Tool
When using the Brush tool in Illustrator, you should set the Brush Definition to “Basic.” Select the “Basic” option in the Brush Panel (F5) when you first “draw the path.”
The Basic option in the Brush Panel does not serve as a brush. Rather, it is a way to eliminate brush strokes from the selected pathways and convert them to just a regular path, thereby enabling the Width Tool.
When you click the Basic button and draw, the default calligraphy brush is applied to your Path without variant effects.
Users should also keep in mind that the Width Tool and the Brush Tool cannot be used at the same time. The Width Tool is mostly used to apply one’s own effect on a basic Path, which could be a shape or text turned into a shape. Because it is intended for constructing path variants, it does not operate in Brush and is disabled.
Use with Pen Tool or Shape Tool
Users who work with the Shape and Pen tools may find the width tool useful. As part of a GUI software, it aids in the avoidance of unnecessary barriers and gives you greater control over your design. It aids in the avoidance of unnecessary barriers and gives you greater control over your design. It will improve your workflow and demonstrate proficiency.
When you use the Pen tool directly for your design, you can control the number of stroke points in the Path. You’ll be able to keep points to a minimum because only you know which area of the Path you want to apply scale and weight. It thereby ensures that the Path is fluid and bump-free.
Use on Tablets
The Width Tool was created exclusively for “tablet” workflow and provides an experience akin to working with a pencil and eraser to adjust the thickness/weight of your Path.
If you’ve already decided to utilize the Width Tool, you can start with a simple stroke path or a pencil. Use Alt + 5 as a short key to conceal the “Width handle.” The same method can be used to make it visible again.
Live-Action
When there are a lot of routes to convert, the option to convert the strokes to basic may not be available, and you may only be able to adjust the width profile. It is also possible that the choice to convert to basic is available, but picking it has no effect. Follow Object> Live Paint> Expand to activate the Width Tool in such instances.
In Short
The Width Tool might provide your design impetus to continue forward with this tool. When strokes can be modified at any time, work becomes more manageable. If you are someone who works with shapes and pen tools, this little-known tool can be very beneficial.
As a designer, I feel the width tool is underrated. If you know the right way of using this tool, it will prove to be beneficial. I hope this blog helped you understand the use of the width tool.
There are many more tools in Illustrator that are a must-know for whoever is interested in making beautiful designs. A few include the Transform tool, Pencil tool, Curvature tool, etc. Explore all the tools and effects if you wish to enhance your Adobe Illustrator skills.
Do you want to know more or need assistance with making animated videos? Contact Us!