Character animation has indeed come a long way from what it once was, all thanks to After Effects. The best thing about Adobe After Effects, one of the most popular character animation software, is that you don't really need to use anything else to create character animation. 

Although some animation may seem easier to make, creating a walk cycle can perhaps be one of the most stressful and challenging aspects of the whole character animation process. If you can manage to master a walk cycle, you're undoubtedly on the right track to master anything in character animation.

A big shout-out to all the creative minds out there; this is perhaps an excellent skill for you to learn as a Motion Graphics Designer. So, keep reading this step-by-step tutorial on how to create a walk cycle animation in After Effects.

What is a Walk Cycle?

A walk cycle is a sequence of frames or illustrations that iterates to create an animation of a walking character. 

Walk cycles can be broken up into four keyframes: Forward Contact Point, Passing Pose1, Back Contact Point, and Passing Pose 2. The first pose is the contact pose, wherein both the feet are in contact with the ground, and the bodyweight is divided equally among both the legs. The second is the passing pose, wherein one foot is on the ground while the other one is lifted. 

Besides the apparent motion of the legs, a lot more details are required for an impressive walk cycle, like the timing of the animation, movement of the arms, head, and torsion of the entire body.

Getting started with Character Walk Cycle Animation 

There are numerous methods to create walk cycles. One of them is creating rigging using the DUIK BASSEL plugin, which allows rigging the body parts of an animated character and making it walk smoothly. It’s an exceptionally quick and simple way to get started with walk animations.

With Duik Bassel, you can not only go into details and adjust the character height and weight, but you can also adjust every individual limb parameter and precisely set how it walks. A nice walk cycle is just a click away.

Can't wait to dip your toes in the magical world of character animation? Well, follow the steps mentioned below to create an excellent walk cycle. Let's roll!

Designing Character in Illustrator
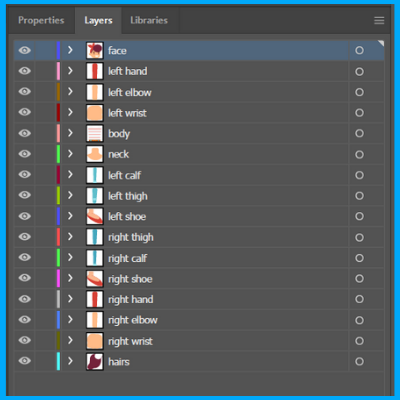
  • Create each body part of a character in a different layer.  This makes rigging relatively easy.
  • Rename each layer as per the body part.
  • Remember, you need to have a rigged character to use the Walk cycle.

Importing Character in After Effects

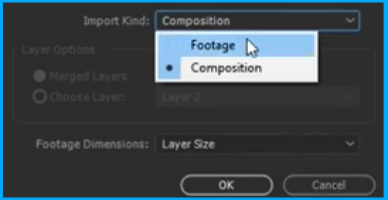
  • While importing the file, you'll get a pop-up box that will ask you to create footage or composition of the particular file.
  • Here you need to select composition so that each layer comes the same way as we created our character.

Creating a Duik Rig 

  • Once we have imported the animated character, we need to fix the anchor point of every character. 
  • The anchor point is where we want our character to rotate or change the position, and it needs to be fixed at each joint.
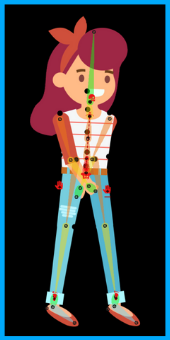
  • Therefore, select all the layers of your character and start rigging using the Hominoid feature of the Duik Bassel plugin.
  • Arrange the rigging structure according to your animated character and link each part of your character to the structure formed by Duik. 
  • Now select all the structures formed and click the Auto-rig & IK feature, which will create controllers of body parts. 

Animating the Walk Cycle

  • After you have created controllers, select all the controllers.
  • Before you start creating the walk cycle, make sure the character is upright, with both the arms adjacent to the body, in a natural pose.
  • Click on the walk cycle feature of the Duik.
  • Duik attempts to auto-detect which arm is the left one and which is the right one. However, depending on the design, this detection may fail at times. In that case, both arms will swing simultaneously. You can fix this in the effects of the controllers for the arms, using the Side property to adjust the side of the arm.
  • You can use the General motion value to start and end the walk cycle. 
  • One particularly significant value is the Cycle duration, which can either be in seconds or frames. To render exemplary loops, you can set the work area or the composition duration to this value.

Refining the Walk Cycle

  • The walk cycle may sometimes need to be refined a little.
  • You can do this using the effects of the walk cycle controller created in the composition.
  • Once you are done creating the walk cycle, the controllers can still be animated. Therefore, you can add your own keyframes to customize the animation as per your liking. 
  • Feel free to move the controllers to modify the posture of the character.

Watch this short video clip to see the end result.

Wrapping Up

I hope you've found this information to be helpful. Remember, it all may seem tedious initially; however, regular practice will take you a long way. Trust me, there's nothing more comforting than bringing a character to life. 

So, what are you waiting for?

Practice those walk cycle skills that you have just learned. 

And if you really dig this easy guide, do check out our videos to get inspired to bring your animated characters to life. And if you're interested in how we did it, do get in touch with us now.

Frequently Asked Questions

A walk cycle in animation is a sequence of frames that depicts a character or object walking in a continuous loop. It is a fundamental animation technique used to create the illusion of realistic movement. In a walk cycle, various poses and movements are repeated, typically involving the swinging of arms, legs, and body to simulate the natural motion of walking.

Creating a character walk animation involves several steps:

  • Start with a clear understanding of the character's design and proportions.
  • Break down the walk cycle into key poses, including contact, down, passing, and up poses.
  • Animate the character's body parts (arms, legs, head) to match the poses and movements in each frame.
  • Pay attention to timing and spacing to create smooth transitions between poses.
  • Preview and refine the animation, adjusting as needed to achieve a convincing walk cycle.

Making an animation walk cycle requires careful planning and animation skills. Here's a simplified process:

  • Begin by drawing the character's key poses, including the start and end positions of the walk.
  • Create additional frames or drawings between the key poses to establish the character's movement.
  • Animate the character's limbs, ensuring that they follow a natural walking motion.
  • Pay attention to timing and spacing, adjusting the distance and speed of movement.
  • Review and refine the walk cycle, making necessary adjustments for a smooth and convincing animation.

The four key poses in a walk cycle are:

  • Contact Pose: This is the initial pose where one foot makes contact with the ground while the other is lifted.
  • Down Pose: In this pose, the character's body is at its lowest point as the other foot comes down to make contact with the ground.
  • Passing Pose: The passing pose occurs when the character's legs cross each other, with one foot lifting off the ground and the other reaching the front.
  • Up Pose: In the up pose, one foot is off the ground, and the character's body begins to rise as the other leg swings forward.

These four poses, when animated smoothly, create the illusion of a continuous walking motion. Additional frames are used to transition between these key poses, resulting in a complete walk cycle.

Leave a Reply

Your email address will not be published. Required fields are marked *