We typically respond the same day


Wix Studio is easy to get on with, but there are some modules where users still struggle to get along. In this tutorial, I will guide you through integrating the slider, pricing, and accordion modules.
Step 1: Create Your Website with Wix Studio Tutorial
When you open Wix Studio, you’ll see a clear Call To Action (CTA) button to create a new site. Clicking this button gives you several versatile options:
- Use a Studio Template from a wide selection of pre-made designs,
- Start with a Blank Canvas to design your website the way you want
- Create a Studio Sitemap and Wireframe directly in the editor for better planning,
- Or use your Own Custom Template built within the studio.

If you choose to skip templates, you can proceed directly to website creation by selecting a template or a blank canvas.
Selecting a studio template loads a list of professional website templates to choose from.
Choosing the blank canvas option takes you straight to the editor page, which comes preset with a basic header and footer, along with a blank section, ready for your design.
How to create your website using the Studio Sitemap & Wireframe Option:-

Wix Studio allows you to input your project details, automatically generating a sitemap and wireframe for your website. This powerful feature helps you plan your site structure and layout upfront, making the design process smoother and more organized.
The above step is optional. You can proceed directly to selecting from a variety of templates to start building your website quickly.
Wix Studio also offers “your own saved template” to let you use custom templates that you’ve created and saved within the platform.

This means you can:
- Design a website layout exactly how you want it
- Save that design as a reusable template
- Quickly start new projects by applying your personalized templates,
- Maintain brand consistency across multiple sites by reusing your custom styles, structures, and elements.
It’s a great way to speed up your workflow and keep your websites aligned with your unique vision or brand guidelines. However, in this article, we will create a website from scratch, meaning from a blank page.

Step 2: Build a Wix Website
Creating the Navigation Menu in the Header Section

To start building your website’s header and navigation in Wix Studio, click the plus (+) icon on the top-left corner to open the Elements Panel. This panel offers a wide variety of drag-and-drop elements, including prebuilt assets, allowing you to add and design any section of your site quickly.

For the navigation menu, you can drag a menu element into your header and place it within the menu. Once added, use the options on the right panel to customize its size, style, font, and alignment.
You also have precise control over spacing; hold the Option (Mac) or Alt (Windows) key and hover near the edges of the element to check the distance from surrounding elements.

Wix Studio provides extensive styling options for each menu item, allowing you to tailor the look and feel to match your brand or design preferences.
We also offer the option to create either standard or dynamic pages. Standard Page will directly add the blank page to the canvas. A dynamic page offers the option to either create a collection or add a preset.

For example, if you are adding a blog section to your website, then you can add a preset. You can select a Blog CMS preset from Wix Studio.
- This provides a prebuilt dynamic page template with a blog post layout.
- It includes fields like Title, Featured Image, Author, Date, Content, etc.
Wix automatically creates a “Blog Posts” collection tied to the preset.
- You can add your posts manually or import them using a comma-separated values (CSV) file.
- Each item in the collection is featured as a separate blog post, utilizing the same template.
Now, your blog page dynamically displays content from the collection.
- When you add a new entry to the “Blog Posts” collection, a new blog post page is generated automatically.
- You only need to input the data; the layout remains consistent.
Step 3: Creating a Hero Section (comprise of Text, Image or Video, and a CTA)
When creating a hero section in Wix Studio, adding and styling text is both powerful and beginner-friendly.
Drag in a text element from the Elements Panel, and you’ll have access to a wide range of styling options from font selection and size adjustments to color, spacing, and alignment controls. All intuitively placed for quick customization.
Wix Studio also supports page transitions and preset text animations, allowing you to add engaging effects without writing any code. You can animate text for different states like hover, regular, or selected using built-in presets. This makes your hero section visually dynamic right out of the box.

Want to create a unique layout, such as a pretext tag or label-style heading? You can easily do this by combining multiple elements like text, shapes, icons, and lines, no buttons or coding required. With drag-and-drop precision, you’re free to craft creative text arrangements that match your brand’s look.
Whether you’re showcasing a bold headline, a subheading, or a CTA line, Wix Studio gives you the tools to make your hero section text visually compelling and interactive without the complexity.
Creating the Hero Section with Images in Wix
When building a hero section in Wix Studio, adding and customizing images is seamless and feature-rich.

After dragging an image element into your section, you can use Wix’s built-in Photo Studio to enhance it. This tool allows you to edit your image directly, adding overlays, backgrounds, filters, elements, and more, all without leaving the editor.
- Adjusting opacity, border radius, and shadows
- Changing the image fit (cover, contain, etc.)
- Adding hover effects or animations for interactivity

These features make it easy to design a visually striking hero image that sets the tone for your site. Whether it’s a full-width banner, a background visual with layered text, or a styled product photo. With Wix Studio, you get creative flexibility without complexity.

Step 4: Creating a Slider section for testimonials
Wix Studio offers a built-in drag-and-drop slider element by default. You can install from the wix app marketplace for pro versions that offer advanced customization.

Once installed, the slider widget appears under the “Add Widget” section in the Elements Panel, which you can then drag and drop onto your canvas. The basic layout and settings can be adjusted directly from the widget itself.

To change the actual content such as testimonial images or logos, you’ll need to navigate to the CMS:
- Go to your Collections,
- Find the collection tied to your slider,
- Click on the relevant entry to access and edit all the testimonial data, including images, text, and logos.

After updating the collection, the slider automatically reflects your new content, allowing you to match your design layout perfectly.
⚠️ Note: Wix offers free slider apps which may have limited styling options, so for more design flexibility (such as transitions, advanced layouts, or custom breakpoints), you may need to upgrade to a premium version.
Step 5: Creating a Tab Module on a Wix site

Want a tabbed layout? Use Wix Studio preset Tab Module, which you can drag and drop onto your canvas from the Elements Panel. Once added, you can fully customize the tab layout by adding or removing sections, changing content, and styling.

Each tab section is easily editable, allowing you to place various types of content, including text, images, icons, and CTAs. You can also choose from multiple CTA layouts and add custom icons to match your design.
However, there are a couple of limitations to note:

- By default, the tab background extends the full width, which may not align with every design style, especially if you want the background to appear only below the tabs.
- For specific designs, you’ll need to manually select a button element that includes the structure or functionality you need, as not all elements come pre-loaded in every tab style.
Despite these minor adjustments, the Tab Module provides a flexible and efficient way to organize content into sections without requiring advanced coding.
Step 5: Creating Repeaters for Content Boxes

When designing content boxes in Wix Studio, using repeaters is an innovative and efficient choice. Repeaters enable you to create a single, styled content box and then replicate it across your page, ensuring that all elements are perfectly aligned, responsive, and consistent without having to duplicate and style each one manually.

To set it up, add a Repeater from the Elements Panel, then place your desired elements (text, icons, buttons, etc.) inside one of the content boxes. Once styled, Wix Studio auto-generates additional boxes with the same design.
You can also apply hover effects to make the boxes interactive. While you can create custom animations and apply basic hover styling, one limitation is that there’s no default option to add borders on hover or change icon states. These effects would require additional customization beyond what’s available in the default repeater settings.

Still, repeaters are a powerful tool for content-heavy layouts, like service listings, team member profiles, or feature blocks, making your design process faster and more consistent.
Step 6: Creating Two-Column Sections
Creating a two-column section in Wix Studio is a quick and straightforward process. You can easily build a layout with two side-by-side cells, one on the left and one on the right.

To do this, simply:
- Add a section to your page,
- Use the layout settings to split it into two columns,
- Then drag in your content like text on one side and an image on the other.
This structure is perfect for creating clean, balanced designs, such as hero layouts, feature highlights, or side-by-side comparisons. It’s a flexible setup that works well across various screen sizes, providing complete control over spacing, alignment, and styling.
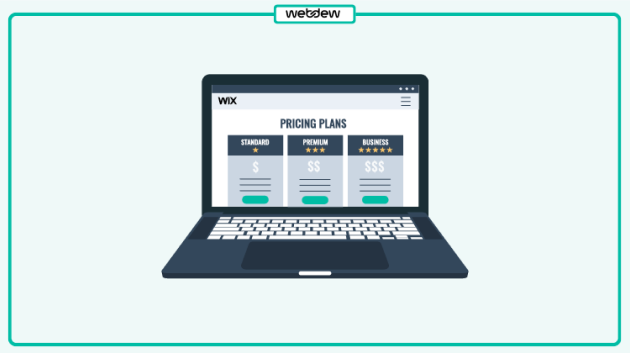
Step 7: Create a Pricing Table on your website
To set up a pricing table in Wix Studio, you have two main options: use a prebuilt template or create a custom one.

1. Add a Pricing Table Layout

Go to the Elements Panel and drag a Pricing Table Template onto your canvas. This gives you a ready-to-use structure that includes:
- Plan titles
- Pricing
- Feature lists
- CTA buttons
You can fully customize the design from the Styling Panel, adjust fonts, colors, layout spacing, button styles, and more to match your brand.
2. Use Wix Pricing Plans (for Functional Plans & Checkout)

To make your pricing table functional (with real subscriptions or gated content), you’ll need to:
- Go to your Wix Dashboard
- Navigate to Pricing Plans
- Click Create New Plan

Enter the following:
- Plan Name and Description
- Decide if you want to enable a free plan, set a trial duration, or allow cancellations
- Choose the billing cycle, monthly or yearly
- Enable payment options and add your payment method (like Wix Payments or third-party gateways)
3. Reflect on the Website Layout
Once created, your pricing plans can be linked to buttons in your pricing table, allowing users to subscribe or make a purchase. Any updates made in the dashboard will be automatically reflected on your site layout.
Optional: Use a Third-Party App
If you need more advanced layouts or payment options, you can install a Pricing Table App from the Wix App Marketplace. These apps often offer additional features like:
- Toggle between monthly/yearly billing
- Advanced styling controls
- Plan comparison features

Step 7: Adding Blog Content

Wix Studio makes it simple to set up a fully functional blog section on your website. You can easily add a blog module that not only creates a dedicated blog listing page but also sets up the backend structure for blog management.

From the Elements Panel, drag in the Blog component. This automatically adds:
- A Blog Listing Page
- A dynamic Blog Post Page
- A Blog CMS Collection in the backend

2. Customize Blog Layouts
Once added, you can choose from multiple blog styles such as grid, list, masonry, etc. and customize the blog cards to fit your brand.
In the Settings Panel, you can adjust:
- Thumbnail display
- Title and excerpt visibility
- Author info, date, and categories
- Hover animations and spacing

3. Create & Manage Blog Posts
Managing blog content is straightforward:
- Go to the Blog section in the dashboard
- Click “Create New Post”
- You’ll get a full-screen editor where you can write, format, and style your post
- Add images, embed videos, set SEO options, and publish with one click

Wix Studio handles all the technical setups. So you can focus on writing and design while still getting a clean, responsive blog layout that’s easy to maintain.
Step 8: Adding FAQ Section to your Wix website
Building an FAQ section in Wix Studio is quick and user-friendly, thanks to the built-in Accordion Modules.

Go to the Elements Panel, search for “Accordion,” and drag the module onto your canvas. This creates a collapsible layout, perfect for displaying questions and answers in a clean, space-saving format.
Once the accordion module is added to your page, you can click on each accordion item to begin customizing.
Start by editing the question title, click into the text area and type in your FAQ question. Below that, enter the answer content in the collapsible section, where you can also format text, add links, or even embed media if needed.

You can design your site using the styling options. Adjust fonts, text size, colors, padding, and icon styles to match your website’s design theme.
If your FAQ section requires more or fewer items, it’s easy to add or remove accordion items with just a click, giving you complete control over the number of questions you want to display.
You can style it as per your theme to make it visually cohesive.
Step 9: Adding Footer Section
Wix Studio offers prebuilt footer layouts which you can drag and drop easily. These layouts are fully customizable. Every element within the wix website builder can be edited, rearranged, or removed based on your design preferences.

You can also add new elements such as icons, social media links, menus, or custom text to tailor the footer exactly to your needs. Use the Wix advanced website design elements to increase site visitors.
Ready to build your site?
Build a website with Wix Studio which fits perfectly on every screen. Use the AI website builder to build a professional website within minutes.
Wix editor strikes a strong balance between design freedom and structured tools, making it suitable for both beginners and professionals. It allows you to create highly visual, customized websites while maintaining control over layout, spacing, and responsiveness.
The platform is intuitive yet powerful enough to handle complex design needs without requiring custom code for every adjustment.
To extend your website’s functionality, Wix Studio also supports app integrations. You can browse the Wix App Marketplace and add tools tailored to your specific needs such as sliders, forms, or pricing tables. However, some free apps come with limitations, and you may need to upgrade to access full features or advanced styling options.
For websites with growing or dynamic content, Wix Studio’s CMS and dynamic page features offer excellent scalability. Whether you’re managing wix blog, portfolios, or product listings, the CMS makes it easy to update content in one place and reflect those changes across the site.
If you’re ready to build confidently, Wix Studio gives you both the creative space and the structure to bring your ideas to life.
Ready to build your site with confidence? Start exploring Wix Studio and bring your creative vision to life! In case of any query you can contact us or comment below!
Dive Into our
Client Testimonials
Listen to business owners like you share how we’ve helped them grow. Your story could be next!


.svg)

“Recently we reached out to Webdew for a website inside of HubSpot and they also did some mocking automation for us.”

“Webdew team was quite honest and quite easy to work with in terms of taking feedback implementing it, showing that it doesn’t happen again and things like making sure that it meets our expectations.”

“We worked with webdew to help us build our HubSpot website and they did an amazing job with it. They were very quick.”

“webdew has helped us optimize the sales and marketing processes, and this is automating a lot of processes.”

“Hi everyone my name is Kara and I work as a channel consultant at HubSpot Singapore. I’ve been working closely with webdew agency”

“Hi my name is Christian from OpenDoors Mortgage team and I’m in the mortgage business and just trying to work on new projects and kind of incorporating HubSpot for my operations”

“I’m one of the technology directors for Travelopia. We are the largest experiential travel company in the world. We’ve engaged webdew recently, not recently, it’s been about a couple of quarters now.”
“We worked with Chehak over the past several months to create a series of animated videos for an academic planner that we produce. And from the very beginning, she was absolutely professional and a pleasure to work with.”


6x
We helped clients multiply their website conversion rates through strategic design and UX optimization.
20%
Our marketing campaigns led to a 20% uplift in customer engagement across digital channels.
2K+
Delivered over 2,000 qualified leads through targeted funnels and smart automation.
120+
Our video content has earned 120,000+ views, driving brand awareness and audience retention.
“I recently had the pleasure of working with Chehak on a video demo project, and I was thoroughly impressed with her services.”
.svg)

Additional Resources
Access expert tips, trends, and strategies designed for small businesses. Stay ahead of the curve and make informed decisions with our comprehensive resources!