Well! We talk a lot about attracting visitors, nurturing leads, generating sales!
Indeed, converting leads is essential for business growth, but understanding the contacts lifecycle stage where leads are in the buyer’s journey is critical.
In fact, understanding the contacts lifecycle stages will not only help your marketing and sales team to better align with your leads but also allows them to easily understand their needs.
HubSpot is all about inbound marketing in which contacts lifecycle stages matter a lot.
{{cta(‘d2ca8ae3-e68c-44bd-bad8-3bf88293fba7′,’justifycenter’)}}
Now you might be wondering what is a contact lifecycle stage. How to create these stages? Such questions might be arising in your mind. But no worries!
This is what we are here for. In this article, we will discuss HubSpot’s Lifecycle Stages in detail. You will also get a clear idea about how these contacts’ lifecycle stages can help you improve your business.
{{cta(’74f06b94-d8bf-45fd-a3bd-397bfa12665b’,’justifycenter’)}}
Let’s get started
What are HubSpot Lifecycle Stages?
HubSpot lifecycle stages are also called customer life cycle stages. It basically helps you, and your team knows where people interacting with your brand are in the buyer’s journey. Now, let’s know what the lifecycle stage of HubSpot looks like.
To make you better understand about HubSpot lifecycle stage, we have divided the stages into three main categories:
- Visitors
- Leads
- Customers
{{cta(‘a2f6ffed-dd5f-4f7e-84fb-5730c9fcbe75′,’justifycenter’)}}
Visitors
Subscribers– Subscribers are the people who are familiar with your business tasks, and looking forward to hearing more from you.
If you continue providing them relevant, informative and attractive content, then there are chances that they might get interested in what you have to offer.
Leads
Lead- Lead is a contact converted to your website and exhibited sales interest beyond subscribing to your content offer. Leads are further categorized into three different types, including:
Marketing Qualified lead– MQL is a contact who is engaged with the marketing team’s efforts but is not interested in receiving a sales call.
These are basically the people who have filled the form in marketing campaigns but not showing any further interest.
Sales Qualified Lead- SQL is a contact who is ready to hear from your sales team. Basically, it comes into consideration. These people show their interest by submitting questions related to your product.
Opportunity: It is a contact that is linked with a deal. These contacts are analyzed and are actually viable leads.
Customers
Customer: A contact successfully closed deals with your company.
Evangelists: You may consider these customers as raving fans. People within their network can become your lead.
Other: Contacts who don’t fit in any of the above stages are categorized under this stage.
{{cta(‘01604fcf-d957-453f-8ba8-c66c4ea13900′,’justifycenter’)}}
Importance of using HubSpot Lifecycle Stages
If you segment your contacts according to the lifecycle stages, it would be easy for you to categorize the contacts and grow your business.
You would be able to quickly fulfill their demands because the needs of contacts vary according to the lifecycle stage.
Excited to know how?!
Take a look.
- It will help you understand your sales cycle easily and identify the bottlenecks.
- You and your team would quickly identify where your contact is present in the marketing or sales process.
- You can easily gather insight into your team, which will further help you improve your sales process.
- By categorizing your contact according to the lifecycle stage, you can easily target them with the right message at the right time.
- It will also help you in making better decisions.
- HubSpot lifecycle stage is a central function of HubSpot and helps you optimize the process. Say if it is not working properly, then you need to fix it.
Now that you understand the benefits of using HubSpot lifecycle stages start leveraging it to the most.
Is it possible to customize HubSpot’s Lifecycle Stages?
Think about the contacts that do not fall in any of the categories mentioned above. Indeed, classifying these contacts is the major challenge that you might face.
The major reason is that it’s impossible to edit the HubSpot default lifecycle stages. But don’t panic!
You can easily create a custom contact property without any hassle, which will further fit your needs and helps you achieve your goals. Also, you can use HubSpot chrome extensions to make tasks effortless and productive.
Follow the steps:
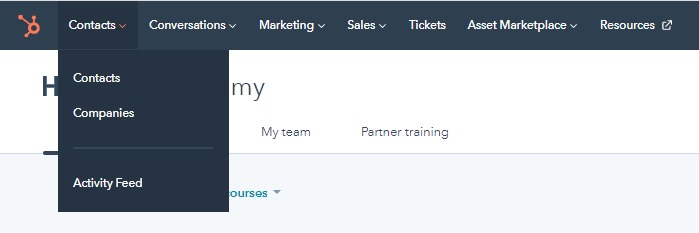
Step-1 Login to your HubSpot account and click on Contacts > Contacts.
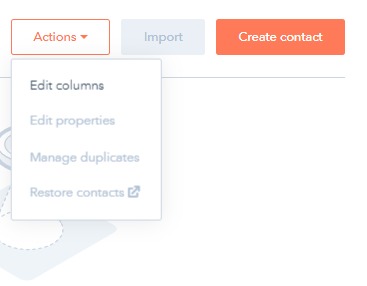
Step-2 Navigate to the top right corner of the page. Choose edit properties by clicking on the Actions drop-down menu.
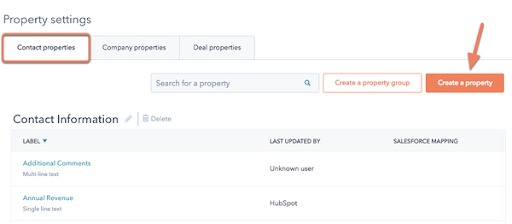
Step-3 Now, select Contact properties and then click on Create a property button.
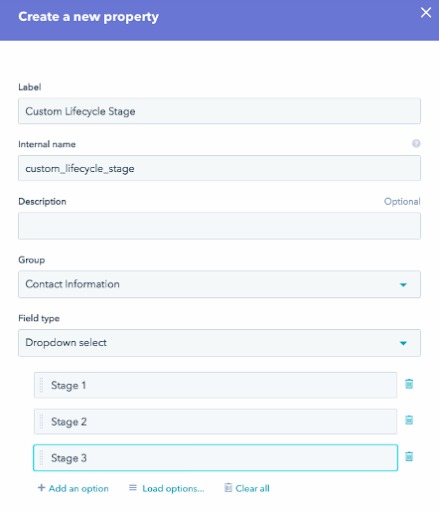
Step-4 Now, enter a Custom lifecycle stage property and click the field type from the drop-down menu.
Step-5 Click on the “+” icon to add an option. Enter your option in the provided field. Continue adding the options as per your requirements.
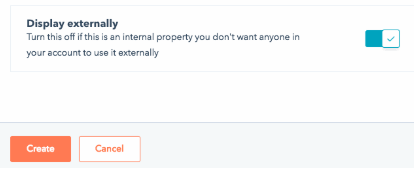
Step-6 Switch on the “Display Externally” option if you want to use the property in your form as a field.
Step-7 Choose the group in which you want your property to appear.
Step-8 Enter the description in the respective field to make users understand what the respective property is used for.
Step-9 Once it’s all done, never forget to click on the Create button.
HubSpot Lifecycle Stages: Best Practices
If you are using HubSpot life cycle stages for the first time, you might have to put some extra effort into understanding its concept.
To make this task easy, we have discussed some best practices. It will definitely help you get started with HubSpot lifecycle stages without any hassle.
{{cta(‘0cc1c3cf-875f-4be3-9cfb-bbe09898d399′,’justifycenter’)}}
Set the Life Cycle Stage of one Contact
Have you ever met with an individual in a meeting or conference who is the right fit for your business?
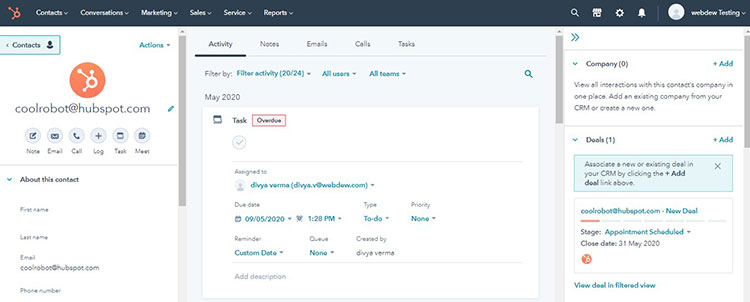
If yes, then most likely, you have added their details in HubSpot manually. When you add the contact manually, make sure you set the contact life cycle stage. Once you add the information, you can easily navigate the contact record.
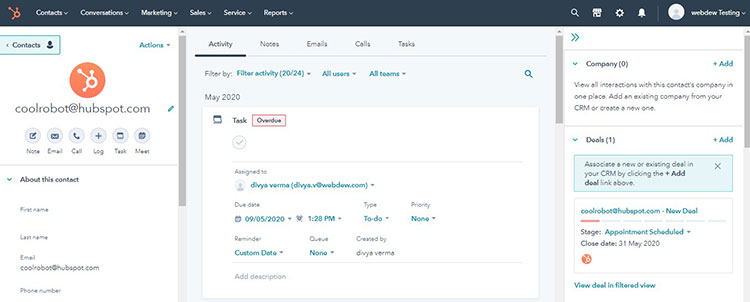
- To view and update the life cycle stage, select the contact. You will redirect to the page like below:
- Navigate to the About box and click on the view all properties button.
- All the details related to the contact can be viewed. Here you can effortlessly search the stage of contact property life cycle and update it according to your requirements.
Set Life Cycle Stage for one List of Contacts while importing into HubSpot
Whenever you import a list of contacts from another partnering software or CRM to HubSpot, make sure you classify the contact according to the life cycle stage in your funnel.
Just with one additional step, you can easily set the life cycle stage for your contact.
Whenever you import your contact details, click on the drop-down menu of “lifecycle stage for contacts in this import” and select the value. The status of your contacts will be updated.
Note- Say if the contacts in your lead status have a variety of stages, then navigate to your CSV import and include a life cycle stage field into it.
You will see that each life cycle stage will have a lifecycle stage in the appropriate column which will further help you make better decisions.
Set Life Cycle Stage when Contact has submitted a Form
By leveraging the hidden form field feature, you can easily assign the stage to that lead without creating workflows. This step will ensure that each contact can easily be tracked at the same when they fill the form.
Below are the steps that will help you do it accurately:
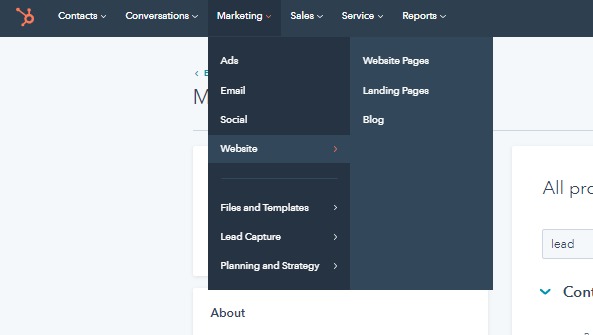
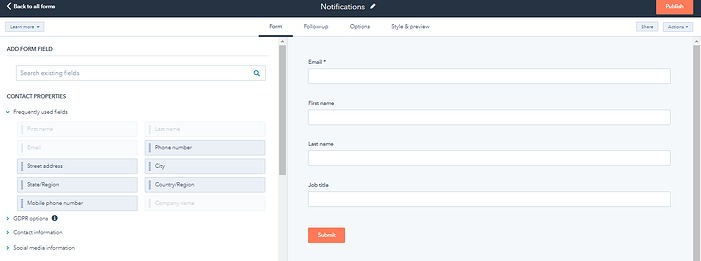
- After logging into your HubSpot account, click on Marketing> Lead Capture> Forms.
- Choose the form or create a new form if required.
- You will be redirected to the form editor page. Navigate to the form field and click on the pencil icon to make the edits.
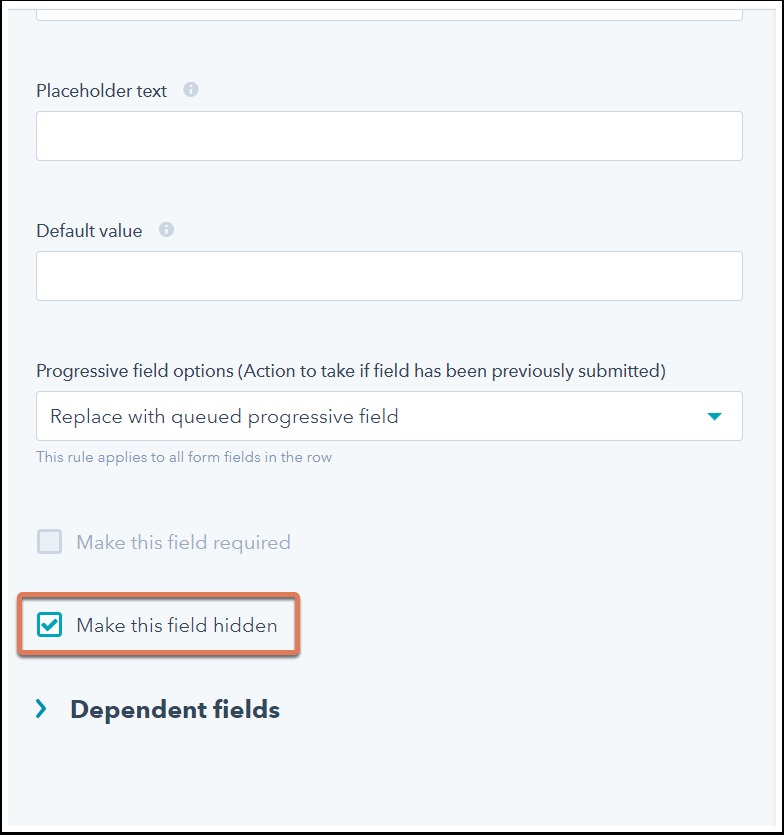
- Choose the “Make this field hidden” checkbox by navigating to the left panel. This means that the contact will not view this specific part of the form.
- Add the value to your contact property which depends on the property field type. While updating, make sure you select the checkbox by default because it will allow you to capture the lead even if they fill the non-HubSpot form on your website.
- Click on Publish.
{{cta(‘3fe31fdd-650c-48da-9e78-bc32658ad334′,’justifycenter’)}}
Set the Life Cycle Stage of multiple Contacts while using HubSpot CRM
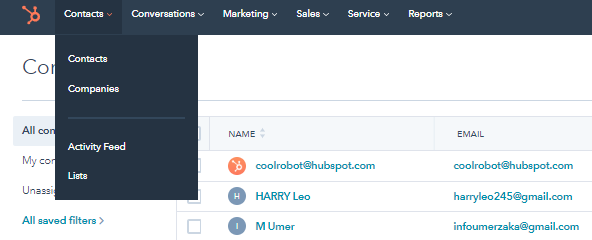
The best part about HubSpot CRM is that you can view all the contacts at one place by navigating> contacts> contacts.
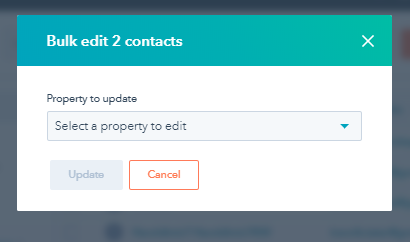
Here you can filter the contacts. Also, you can set a life cycle stage for two or more contacts easily.
You just need to follow some steps mentioned below:
- Select the checkbox placed next to the contact for which you want to set the lifecycle stage.
- Click on the edit button added at the top of the page.
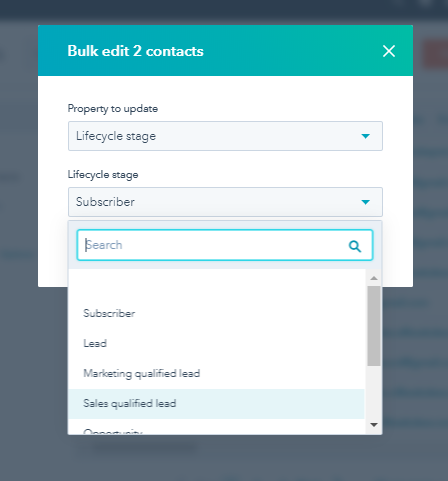
- Click on the drop-down button and select Lifecycle stage as a property.
- Choose the life cycle stage you want to assign to the selected contacts.
- Once it’s all done, click on the Update button to apply.
Use Workflows to mark Life Cycle Stage of the Contacts Constantly
Workflows are another way by using which you can constantly mark the contacts with specific lifecycle stages as per your sales funnel.
If you have set a workflow, then the lifecycle stage of the contact will be updated automatically. It will be done based on actions and the meeting of specific criteria.
So, create workflows according to the behavior and demographic of the contacts. Well, to do this task:
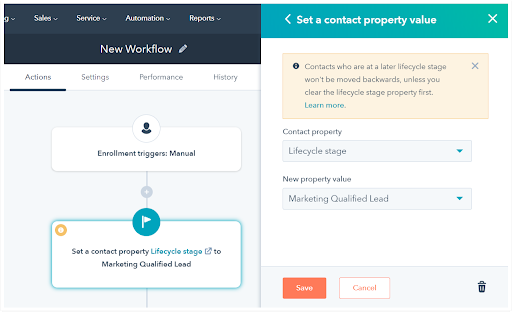
- Navigate to the Automation>Workflow.
- Click on create Workflow and set the enrollment trigger.
- Now, click on the + icon to add actions to the Workflow.
- Navigate to the right of the page and click on set contact property value. Also, choose the lifecycle stage value from the drop-down list you want to set on your contact’s records.
- Once it’s all done, click on the Save button and turn on the Workflow by clicking on the Activate button.
By using all these best practices, you would be able to segment, report, personalize and optimize your business task by understanding the life cycle stage of your contact efficiently.
Useful reading- What is HubSpot Workflows? How to use it for Lead Nurturing?
How to automatically sync Lifecycle Stages between certain Records?
If you want to save your time, you might have to invest in updating the lifecycle stage of associated contacts and companies, then take advantage of lifecycle stage sync between certain records.
Companies and their associated Contact Records
To change the Lifecycle Stage value on a company record, enable the company life cycle stage setting. It will further be updated to all the associated records automatically.
To update the settings for companies and contacts, follow the below-mentioned steps:
- After logging into your HubSpot account, navigate to the main navigation bar and click on settings.
- Navigate to the left sidebar and click on contacts and companies.
- Now, click on the companies tab and switch on the toggle button.
If two contacts are associated with a company, one is with the opportunity stage, and the other is with a subscriber, and the company’s life cycle is set to lead, then the status of the Lead lifecycle stage will be updated to the subscriber.
Also, by updating the company’s life cycle stage to the customer, the contact life cycle stage will be updated.
Deals and their associated Contact Records
To update the lifecycle stage of companies and contacts whenever a deal is created, won, or closed, enable the “deals lifecycle stage sync setting.”
After updating, whenever a deal is created, both companies and contacts lifecycle stage will be updated to opportunity. But if the deal is won, then the lifecycle stage of both companies and contacts will be updated to the customer.
- To update the setting for the deal, log in to the HubSpot account.
- Navigate to the main menu and click on the settings icon.
- Click on the Sales > Deals button from the left sidebar menu.
- Click on the “Sync lifecycle stages to associated contacts and companies “button.
Say if the lifecycle stage of contact is customer and deal is created, then the contact stage will not be updated to opportunity.
But if the life cycle stage is set to lead and a deal is created, then the contact stage will be changed to opportunity automatically.
Note- Remember that once you enable the button, it becomes impossible to set the life cycle stage of contacts backward.
{{cta(‘dd6c3e01-d0a2-4d7d-9dde-ad6df50933b7′,’justifycenter’)}}
The last Say
Now that you understand how important it is to categorize contacts according to the life cycle stage make sure you use it to add value to your business and know what your customers are craving for.
Always remember that by providing the right information at the right time to the individual, you can easily convert the visitor into a lead and a promoter.
Are you still having second thoughts? Feel free to contact us.
We are HubSpot Diamond partners. Our experts are available 24*7 and will be happy to resolve all your queries.
