


 We typically respond the same day


Text formatting, styling, and animating capabilities are great – and when combined with 3d objects, creating text-based animations is absolutely addictive. Besides, deforming a graphic or text is pretty easy, and you can do it with a plethora of tools offered by Illustrator.
Thinking to wrap text to 3D shapes might not be used often; however, it can save you a great deal of time while adapting your graphics to a particular shape. And honestly, wrapping text in Illustrator is much simpler than wrapping a present!
Today, I’ll show you how easily you can wrap text on 3d shapes using nothing but the default Adobe Illustrator tools. Excited to wrap text around your favorite shapes? So, let’s find out how we can create fascinating designs.
Before we get started let’s look at this infographic quickly and get to know that what’s Adobe Illustrator.

Getting started with text wrapping
Perhaps, the best thing about creating 3D objects in Adobe Illustrator is that you can easily adjust the text size. Besides, you can import them into other Adobe software and third-party products in no time.
A text wrap allows you to wrap text around an object or a graphic, adding a touch of creativity to any piece. We can use 3D text wrapping in logo designing, logo animation, and character animation.

Wrap text around a sphere
First, we’ll see how we can create a spherical design.


Step 3:

Step 4:

Step 5:


Step 6:

Step 7:

Step 8:

Step 9:

Step 10:

Step 11:

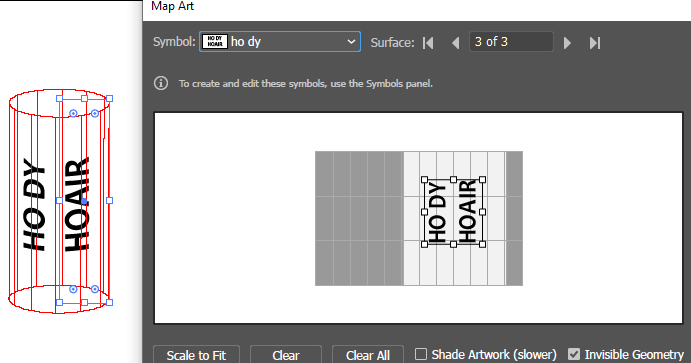
Wrap text around a cylinder
Now let’s find out how to add text to a cylindrical shape.
Step 1:

Step 2:

Step 3:

Step 4:

Step 5:


Step 6:

- Step 7: Now, ungroup it and release the clipping mask. Select these pieces and place them over the shape.

Step 8:

Step 9:

Ready to start wrapping text to 3D Shapes?
There you go, folks! Now you know how to use Adobe Illustrator to quickly wrap text around any 3d shape you want.
And remember, the trick is knowing how and where to make adjustments. Lay out the text along a path, rotate the path in 3D space, and finally rotate the text itself to stand up on the path. Besides, don’t forget to switch the group containing your text and the shape from the default 2D group to 3D.
So, what are you waiting for? Start practicing and improve Adobe Illustrator skills to use Illustrator like a pro. Wrap text in any shape you like and use it to create something interesting.
And in case you have any questions, do get in touch.
Editor: Richa Sharma
Dive Into our
Client Testimonials
Listen to business owners like you share how we’ve helped them grow. Your story could be next!


.svg)

“Recently we reached out to Webdew for a website inside of HubSpot and they also did some mocking automation for us.”

“Webdew team was quite honest and quite easy to work with in terms of taking feedback implementing it, showing that it doesn’t happen again and things like making sure that it meets our expectations.”

“We worked with webdew to help us build our HubSpot website and they did an amazing job with it. They were very quick.”

“webdew has helped us optimize the sales and marketing processes, and this is automating a lot of processes.”

“Hi everyone my name is Kara and I work as a channel consultant at HubSpot Singapore. I’ve been working closely with webdew agency”

“Hi my name is Christian from OpenDoors Mortgage team and I’m in the mortgage business and just trying to work on new projects and kind of incorporating HubSpot for my operations”

“I’m one of the technology directors for Travelopia. We are the largest experiential travel company in the world. We’ve engaged webdew recently, not recently, it’s been about a couple of quarters now.”
“We worked with Chehak over the past several months to create a series of animated videos for an academic planner that we produce. And from the very beginning, she was absolutely professional and a pleasure to work with.”


6x
We helped clients multiply their website conversion rates through strategic design and UX optimization.
20%
Our marketing campaigns led to a 20% uplift in customer engagement across digital channels.
2K+
Delivered over 2,000 qualified leads through targeted funnels and smart automation.
120+
Our video content has earned 120,000+ views, driving brand awareness and audience retention.
“I recently had the pleasure of working with Chehak on a video demo project, and I was thoroughly impressed with her services.”
.svg)

Additional Resources
Access expert tips, trends, and strategies designed for small businesses. Stay ahead of the curve and make informed decisions with our comprehensive resources!


