Well! I have been working in the visual effects industry for the last many years and found that almost every artist aims to achieve photorealism in 3D product modeling. Irrespective of how detailed or clean your models are, you cannot make your design look realistic unless or until you apply the right texture and materials.
But all thanks to 3D rendering software. It basically offers different shaders that further help to control all the attributes of how light reacts with the surface of geometry. These are basically used to make the surface look reflective, reflective, translucent, transparent, soft, or rough.
Say if you have a deeper understanding of all these attributes, then you can easily work on physical-based rendering.
But yes, these attributes alone cannot help you in giving final photorealistic results. You need to use texture maps as it will surely help you to achieve the goals as they have greater flexibility and the ability to create appealing abstract textures.
Are you new to PBR texture maps? If yes, then don’t worry! In this blog, we will be covering different types of texture maps that will help you to make photorealistic 3D graphics with different texture maps without any hassle.
Now without any further ado, let’s understand more about texture maps and their types.
What are Texture Maps?
Texture maps are basically applied to the 3D models‘ surfaces to give special visual effects to the images like sun, clothes, hair, etc., in certain parts of geometry. Well! Texture maps are further classified into two types, including procedural and bitmaps.
Procedural textures: Procedural textures, also known as maps, are generated with the help of computers via mathematical descriptions or algorithms. These fixed sets of parameters make unique variations of texture that further give perfection to the image.
Bitmap textures: Bitmap textures are basically images that are created in digital format. These raster-based images help to store data that manipulates all the attributes of the shader. Many artists use these images to offer objects and models with additional detail.

Now, let’s discuss different types of PBR texture maps by using which you can create appealing photorealistic 3D motion graphics. But here, you need to keep a check that all the maps that are discussed below are linked to different attributes of a shader that further produce different results.
Different types of Texture Maps
Here are the different types of texture Maps used in PBR:
Diffuse/Color Map
Just think for a moment, whenever we look at some image, what is the first thing that we usually notice? Yes, the color. It can be a color variation or color pattern. For example, if we see a brown color with an anisotropic lines pattern, then it resembles wood.

These maps store all the base colors that further make the image more professional. So, if you want the color of your texture, then you can use this diffuse or color map.
Roughness/Glossiness Map
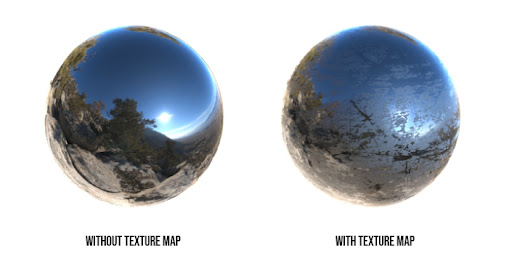
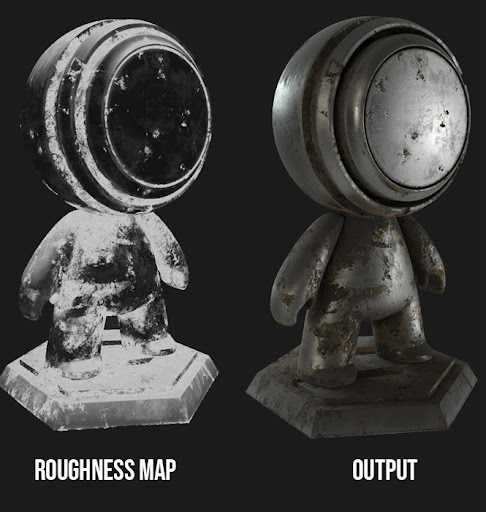
Roughness/Glossiness map, also known as microsurface scattering, is a grayscale map where white color means maximum glossiness and black color means maximum roughness. Say if you want to add variation in the glossiness or roughness of a surface, then you can surely use this.
In the image shown below, you can see the areas of the 3D model painted in black color are glossy, whereas the image painted in white seems to be rough. So, if you want to spread the lighting and reflection around the model, then you can surely use these maps.

Metalness Map
A metal map is another grayscale map. In this style, black and white values are used to showcase the variation between two different parts.
Just as in the image shown below, the black value is used as diffuse color. Say, if you want to simulate real-world metallic materials, then you can surely go with a metalness map.

Opacity Maps
Opacity is another essential type of map that will help you to make some parts of your image transparent. This type of map is usually used when someone needs to make glass or tree branches. These maps are basically the grayscale with which you can showcase the way you want.
Bump Map
A bump map or height map is another greyscale map that helps you in creating the illusion of depth without actually affecting the geometry.
Say if the map warps around your base mesh, then you can still see some bumps in your mesh in all directions. Indeed you might not see accurate results as modern normal maps; that’s why many artists ignore using this.

Normal Maps
Do you want to give depth to the texture? Then normal maps can help you out. These maps use complex calculations that help to make calculations so that light interacts with the material in a fake way which further snakes smaller dents and bumps.
Usually, normal maps don’t actually change the geometry of your 3D model, but if you want to create 3D game assets, then yes, normal maps can help you out.
Displacement Maps
Last but not least, the displacement maps. You can go with this type of map if you want to add all the details in your images, like pores, scales, veins, bricks, and many more.
Many artists prefer using these maps because they not only help to create the illusion of a raised surface but also affect the geometry that will produce high detailed renders. Moreover, displacement maps are not useful in creating game assets as the details produced with these maps are only visible in rendered output and not in the game engine itself.

All these maps can be linked to 3d geometry in different 3d programs like Blender, Maya, 3Ds max, etc. Moreover, high-quality photorealistic renders can be produced using render engines like Arnold, Vray, cycles, etc.
The Final Say
So, now you are somewhat close to professionalism. By using special software and technique, you can give an appealing look to your image. Once you understand how to add a bump to the image, how to add reflection, and how to incorporate lighting through maps, then it will be much easier for you to improve the quality of the images.
So, what are you looking for? Give your image an appealing look by enhancing all the glancing angles.
Hope you enjoyed the article. If you have plans on making animations, motion graphics, or need a hand with logo animations, feel free to contact us.
Editor: Divya